Changes to the kind of display of the network can be performed in the
Setup panel. All settings become valid only after the button
 is clicked. The whole display window is then redrawn.
The button  toggles the display of information which can
be selected with the button
toggles the display of information which can
be selected with the button  . The unit name, unit
number, or the z-value (3D coordinate) can be displayed above the unit,
the activation, initial activation, bias, or output of the unit below
the unit. The numerical attribute selected with the button
. The unit name, unit
number, or the z-value (3D coordinate) can be displayed above the unit,
the activation, initial activation, bias, or output of the unit below
the unit. The numerical attribute selected with the button  at the bottom of the unit (activation, initial activation,
output, or bias) also determines the size of the unit in the graphical
representation.
at the bottom of the unit (activation, initial activation,
output, or bias) also determines the size of the unit in the graphical
representation.
It is usually not advisable to switch off top (number or name), because this information is needed for reference to the info panel. An unnamed unit is always displayed with its number.
 ,
,  ,
,  .
.
 determines whether to draw links at all (then
 is inverted),
 displays link weights at the center of the
line representing the link,
displays link weights at the center of the
line representing the link,
 displays arrow heads of the links pointing
from source to target unit.
displays arrow heads of the links pointing
from source to target unit.
 invokes another popup window to select the
display of up to eight different layers in the display window. Layers are
being stacked like transparent sheets of paper and allow for a selective
display of units and links. These layers need NOT
correspond with layers of units of the network topology (as in
multilayer feed-forward networks), but they may do so. Layers are very
useful to display only a selected subset of the network. The display
of each layer can be switched on or off independently. A unit may
belong to several layers at the same time. The assignment of units to
layers can be done with the menu assign layers invoked with the
button OPTIONS in the main Info panel.
invokes another popup window to select the
display of up to eight different layers in the display window. Layers are
being stacked like transparent sheets of paper and allow for a selective
display of units and links. These layers need NOT
correspond with layers of units of the network topology (as in
multilayer feed-forward networks), but they may do so. Layers are very
useful to display only a selected subset of the network. The display
of each layer can be switched on or off independently. A unit may
belong to several layers at the same time. The assignment of units to
layers can be done with the menu assign layers invoked with the
button OPTIONS in the main Info panel.
 sets the 2D--display colors. On monochrome
terminals, black on white or white on black representation of the
network can be selected from a popup menu. On color displays, a color
editing window is opened. This window consists of three parts:
sets the 2D--display colors. On monochrome
terminals, black on white or white on black representation of the
network can be selected from a popup menu. On color displays, a color
editing window is opened. This window consists of three parts:
The palette of available colors at the top, the buttons to select the item to be colored in the lower left region, and the color preview window in the lower right region.
A color is set by clicking first at the appropriate button ( ,
,  , or
, or  ) and then at the
desired color in the color palette. The selected setting is immediately
displayed in the color preview window. All colors may be set in
any order and any number of times. The changes become effective in the
corresponding 2D--display only after both the setup panel and the
color edit panel have been dismissed with the
) and then at the
desired color in the color palette. The selected setting is immediately
displayed in the color preview window. All colors may be set in
any order and any number of times. The changes become effective in the
corresponding 2D--display only after both the setup panel and the
color edit panel have been dismissed with the  button.
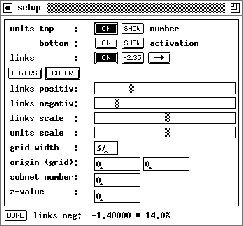
There are two slidebars to set thresholds for the display of links.
When the bubble is moved, the current threshold is displayed in
absolute and relative value at the bottom of the setup panel. Only
those links with an absolute value above the threshold are displayed.
The range of the absolute values is  (see also paragraph
 ![]() ). The trigger values can be
set independently for positive and negative weights. With these link
thresholds the user can concentrate on the strong connections.
Reducing the number of links drawn is an effective means to speed up
the drawing of the displays, since line drawing takes most of the time
to display a network.
). The trigger values can be
set independently for positive and negative weights. With these link
thresholds the user can concentrate on the strong connections.
Reducing the number of links drawn is an effective means to speed up
the drawing of the displays, since line drawing takes most of the time
to display a network.
Note: The links that are not drawn are only invisible. They still remain accessible, i.e. they are affected by editor operations.
 . A scale factor of
  draws the unit with
activation
draws the unit with
activation  with full size. A scale factor of
  draws a unit
with activation
draws a unit
with activation  only with half size.